Part 1 – Deployment and SSO Integration
At my day job I recently led a project to move away from CloudHealth for cost reporting and implement some new tools to replace the functionality of CloudHealth. CloudHealth is a great tool but my company no longer wanted to pay a percentage of our spend just to get the reporting capabilities, especially as our spend continues to grow. While I found that native tools like AWS Cost Explorer and Cost Categories met a lot of our requirements, I wanted some additional analytics tools that allowed us to see billing data across multiple AWS accounts in a single dashboard, as well as provide a means to restrict users to only be able to see certain AWS account
To solve this requirement, my AWS Technical Account Manager let me know about a set of open source QuickSight Cost Intelligence dashboards developed by AWS. The suite includes the CUDOS Dashboard, Cost Intelligence Dashboard, Trusted Advisor Dashboard, and Trends dashboard and are all built using a combination of AWS services including the Cost and Usage Report, S3, Glue, Athena and QuickSight. You can read up more on these offerings and the underlying architecture in this AWS blog post.
This article is not going to be a walkthrough on how to setup these dashboards from scratch. There is already an excellent guide on this in the form of a series of AWS Well Architected Labs that guide you through the whole process. You can also use this demo site from AWS to get hands on with the dashboards to check out their capabilities. I suggest you go through these labs to get the dashboards setup and then come back here and read my posts for a series of tips for how to implement this solution for a large enterprise supporting multiple different cloud teams.
For this series of articles I’m going to be primarily focusing on the CUDOS dashboard which looks like this:
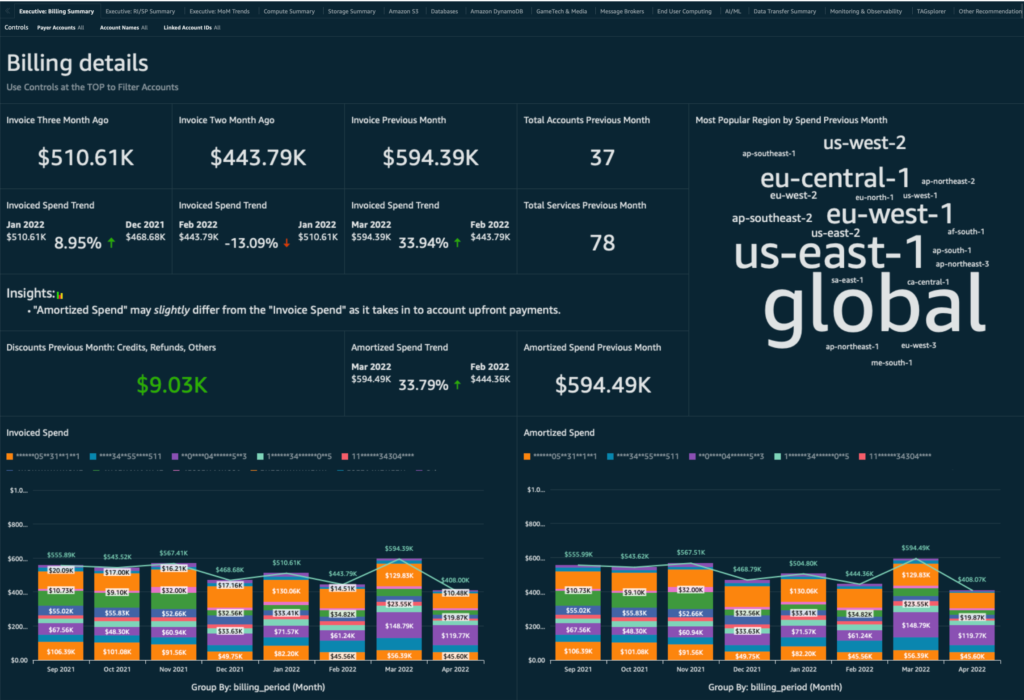
Part 1 of this series will be on Implementing AWS SSO for QuickSight. Future posts will cover topics like customizing and publishing dashboards to users, as well as how to implement row level security in QuickSight to filter access for different account owners.
Implementing AWS SSO for QuickSight
To make things simple, I deployed my QuickSight dashboards in my AWS organization payer account aka the management account. However I don’t want to allow everyone who needs access to these dashboards to login to the AWS Console on my management account. Instead, I wanted them to login to QuickSight directly via SSO. In my environment I already have AWS SSO implemented to allow users to access the AWS Console using their corporate credentials, so I was able to extend that capability to provide a login for QuickSight. If you need guidance on setting up AWS SSO for the first time, I refer you to AWS’ documentation on the subject.
AWS also provides pretty good documentation on how to implement various IdPs with Amazon QuickSight, but in this post I’ve distilled down a step-by-step guide for implementing AWS Single Sign-On as your IdP for QuickSight (assumes you already have AWS Single Sign-On implemented for AWS Console logins). To complete the setup, there are four tasks we much complete:
- Configure a new Application in the IdP (AWS SSO)
- Create new SAML IdP in AWS IAM and configure it for QuickSight
- Update attribute mappings in AWS SSO
- Assign users to your new Application in AWS SSO
Create new Application in AWS Single Sign-On
- Login to your AWS Organization Management account, navigate to the AWS Single Sign-on service
- On the left hand bar, click on Applications.
- On the Applications screen, click the blue Add a new application button
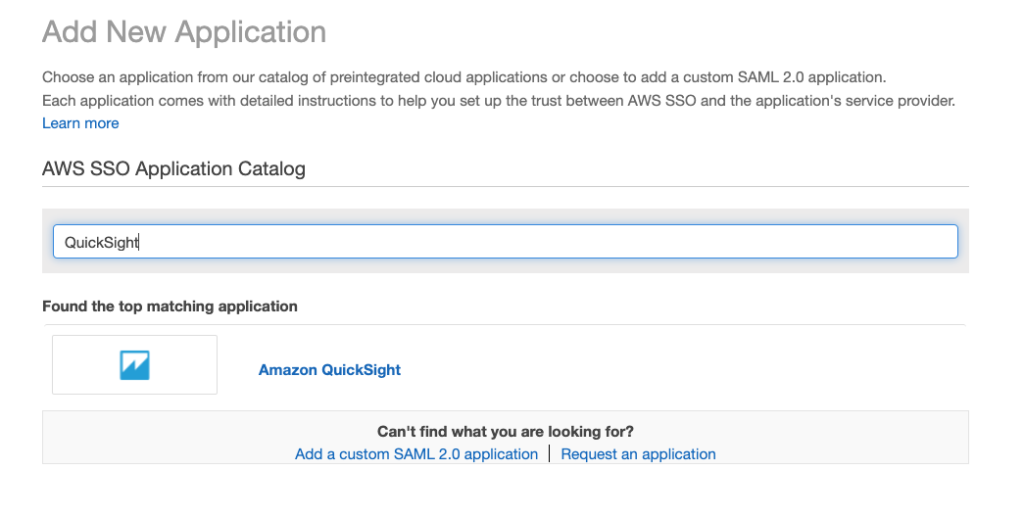
4. In the search box, type “QuickSight“
5. When Amazon QuickSight is displayed, click on it to select it and then click the blue Add Application button at the bottom of the screen
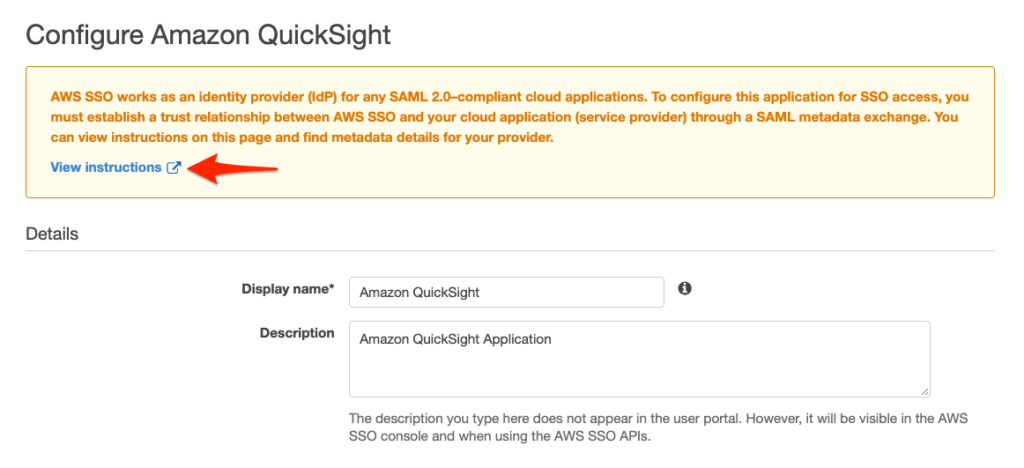
6. The next screen will allow you to enter configuration details for your application. Click on the View instructions link to get the specific configuration instructions for Amazon QuickSight, which I will walk you through below
7. Under Details, enter a display name and description for your app. You can accept the defaults if you wish.
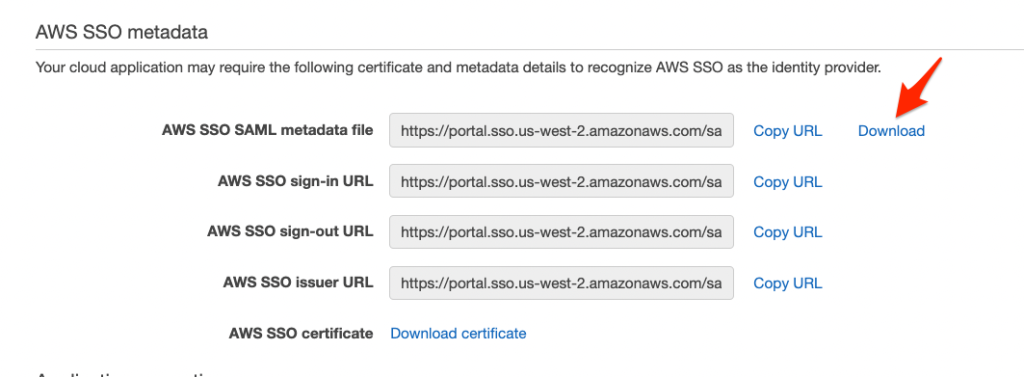
8. In the AWS SSO metadata section, click the link to download the AWS SSO Metadata file to your computer. We will use this file later when we complete the IAM configuration.

9. Under Application properties, ensure Relay State has the value https://quicksight.aws.amazon.com and set the Session duration to whatever value you prefer…I recommend keeping it to 4 hours or less.

10. Under Application metadata, ensure that the Application ACS URL is set to https://signin.aws.amazon.com/saml and the SAML audience should be set to urn:amazon:webservices
Click Save Changes to save your SAML configuration. Now we are ready to move on to IAM configuration
Create new IAM SAML Identity Provider
First we need to create a new Identity Provider in IAM for the Application we just created.
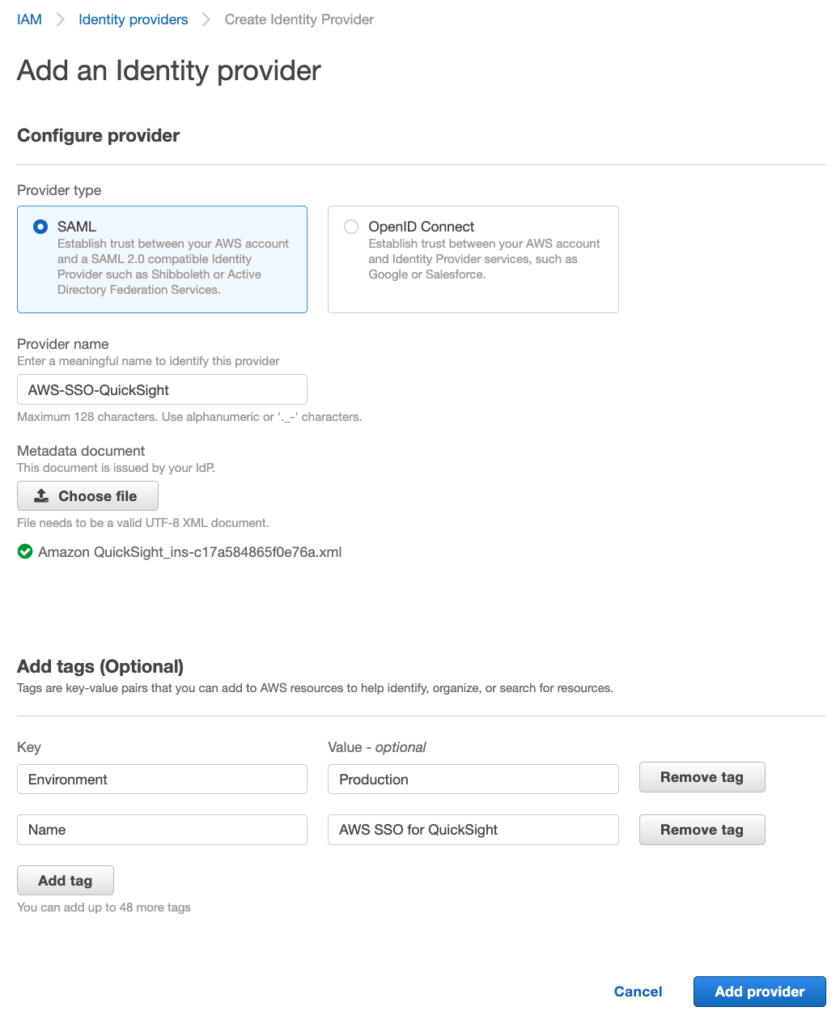
- If you are not already signed in, sign in to the AWS Management Console in your Management account
- Navigate to the IAM service
- On the left hand navigation bar, click Identity Providers
- Click the blue button Add Provider on the upper right
- On the resulting screen, leave the provider type as SAML
- Enter a unique provider name
- Click the Choose file button and upload the metadata file you downloaded in the earlier section
- Add tags as appropriate and click the blue Add Provider button
Next, we need to implement a SAML Federation IAM role. The purpose of this role is to establish a trust relationship between IAM and AWS SSO. To implement, navigate to the Roles section of IAM and click Create Role. I will walk you through each step of the Create Role wizard.
Step 1 – Select Trusted Entity
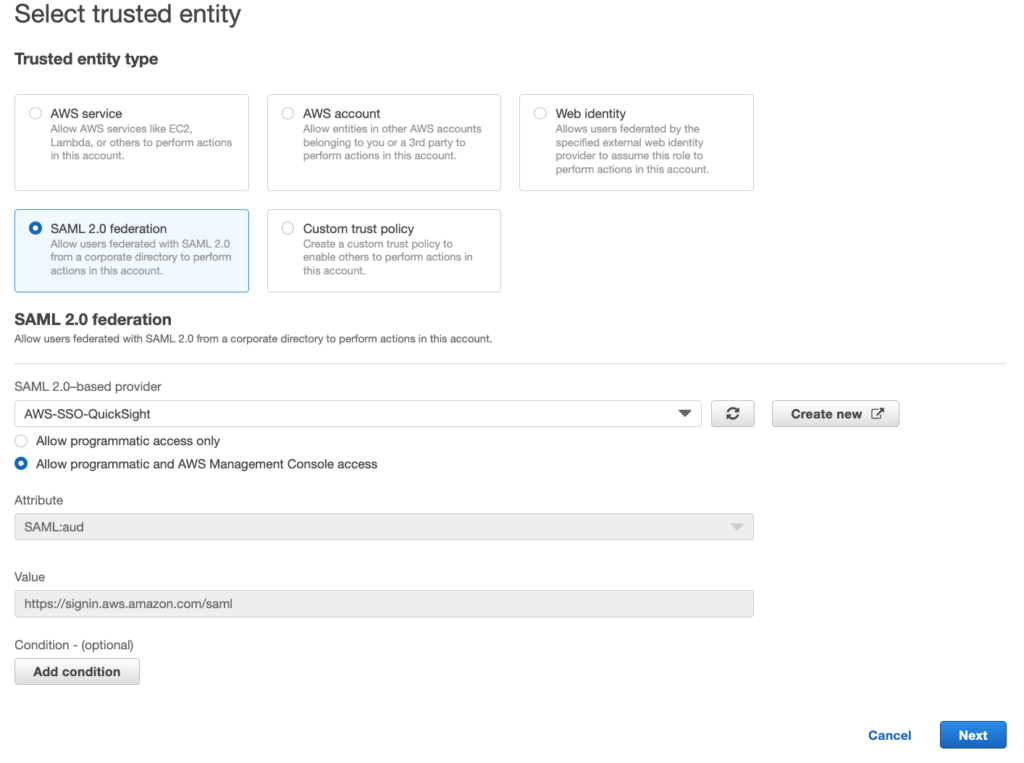
- Click the Radio button next to “SAML 2.0 federation”
- From the SAML 2.0 Provider drop down, select the IDP you just created
- Select the radio button for “Allow programmatic and AWS Management Console access”
- Click the blue Next button
Step 2 – Add permissions
Now we need to attach a policy to this new role. We will be building a custom policy so click the Create Policy button on the upper right. A new window will pop open for you to create a policy, click the JSON tab and enter a policy in JSON format using the following as a guide, replacing the account ID with your own:
{
    "Version": "2012-10-17",
    "Statement": [
        {
            "Action": [
                "quicksight:CreateReader"
            ],
            "Effect": "Allow",
            "Resource": "arn:aws:quicksight::accountid:user/${aws:userid}"
        }
    ]
}
Note that for my purposes, I only want SSO users to have the QuickSightReader permission, so my policy only includes that permission. This QuickSight documentation page provides details on additional permissions you can grant if desired.
Give your policy a name and then click the blue Create Policy button.
Go back to the window where you were creating the new Role, click refresh on the policy screen, and then select the new policy you just created and click Next.
Step 3 – Name, review and create
Give your role a name, a description and validate the trust and permissions are correct. Add tags as needed and then click the blue Create role button.
Update Attribute Mapping in AWS SSO
With our IDP and IAM role created, we need to go back to AWS Single Sign On and update our QuickSight application with the proper attribute mappings to use the IAM role and IDP.
- While signed in to the AWS Management Console in the Organizations Management account, navigate back to the AWS Single Sign-On (SSO) service
- On the left hand menu, select Applications
- Click on the Amazon QuickSight application you previously created
- Choose the Attribute Mappings tab
- Click Add new attribute mapping
- In the first field, enter https://aws.amazon.com/SAML/Attributes/Role
- In the Value field, enter both the ARNs for the IAM role and the SAML provider separated with a comma, e.g. arn:aws:iam::ACCOUNTID:role/ROLENAME,arn:aws:iam::ACCOUNTID:saml-provider/SAMLPROVIDERNAME
- Leave Format as unspecified
- Click the blue Save Changes button
Assign Users to Application
With all the back-end setup work completed, we can now assign users to our QuickSight application!
- While signed in to the AWS Management Console in the Organizations Management account, navigate back to the AWS Single Sign-On (SSO) service
- On the left hand menu, select Applications
- Click on the Amazon QuickSight application you previously created
- Choose the Assigned Users tab
- Click the blue Assign users button
- In the assign Users screen you can toggle between Users and Groups, select the User or Group you wish to assign to the Application and then click the blue Assign users button
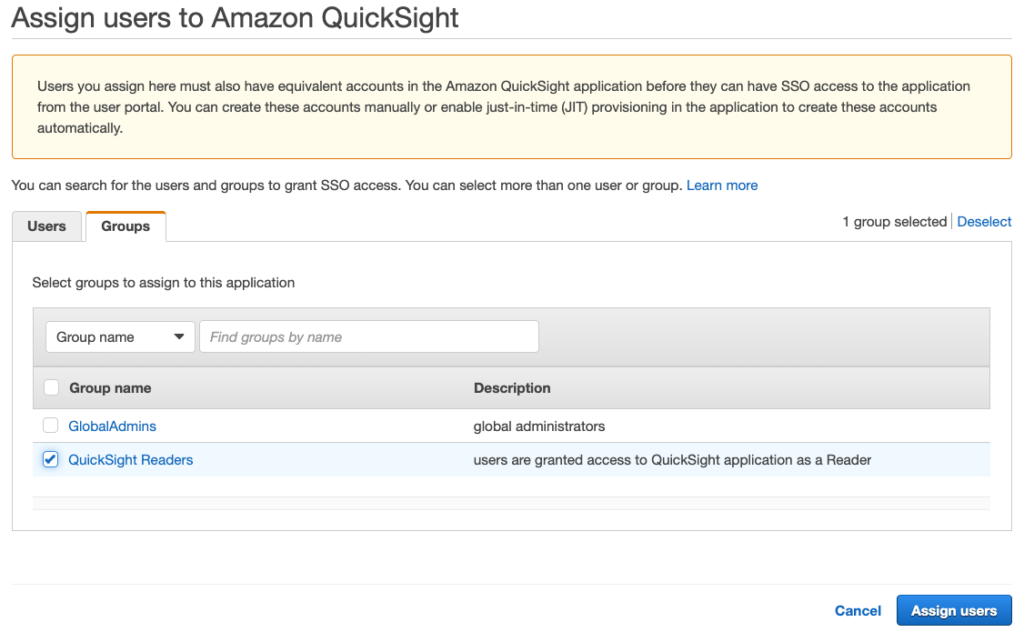
NOTE: I’d recommend you create a new AWS SSO group for this purpose and assign the application to the group. That way when you onboard more users you can just add them to the group.
Test!
With all the configuration out of the way, you can now test the SSO configuration. Login to your AWS SSO portal using the user you assigned to the QuickSight Application. In addition to the AWS Account application they should now see an application button for Amazon QuickSight.
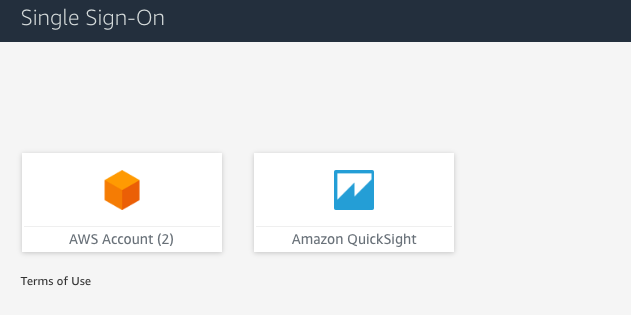
Clicking on the Amazon QuickSight button will launch QuickSight in a new window and the user will be walked through the first time login screen. Note when they initially login they will not have any dashboards visible until an admin assigns them. I will cover this topic in my next post in this series so stay tuned!
Conclusion
In this article I gave you a quick introduction to the QuickSight Cost Intelligence dashboards, and walked you through how you can connect AWS Single Sign-on to QuickSight so that users can use their corporate credentials to access QuickSight directly. In future articles in this series I will be covering customizing and publishing dashboards to users, as well as how to implement QuickSight Groups and use row level security in QuickSight to filter access for different account owners. I hope you found this information useful, and please feel free to send me feedback or ask questions in the comments below.
Finally, I have to give a huge thanks to Jenny Oshima, my AWS Technical Account Manager, as well as Aaron Edell, GTM for Customer Cloud Intelligence for AWS who helped me out a ton during the implementation phase of this project.
References:
AWS Blog – A Detailed Overview of the Cost Intelligence Dashboard

This is such a great article. Very helpful. Thanks Mike!